Hi guys,
welcome back to another post, which is giving you some more insights into my overall backup strategy.
This time I’d like to talk about the importance of offsite backups and how you can easily integrate Synology’s very own solution, the Synology C2, into your Synology DiskStation environment.
But before we get into the technical details, let’s have a look on why you should consider backing up your content offsite at all.
The importance of offsite backups
It should be pretty clear and logical to most of you, that backing up your digital content is a very important task. Not only ensures it a recovery of your data in case of a disk failure but also in situations of accidental file deletion or when you might get stolen your equipment or storage solutions.
In fact, having multiple physical copies of your data is protecting you against most scenarios, but one important key factor to consider is to store these copies at different locations. An apartment fire or similar tragic disaster could lead to a complete loss of your overall content. Especially when being a freelancing creator this could mean loosing your complete business from one second to the other.
There’s a variety of approaches to realise a proper strategy including offsite backups. One pretty common way is to mirror your data on a second hard disk at regular intervals and store this disk at another location, like for example a friend’s house or a safe deposit locker at your bank branch. While this might be a very good step in the right direction, this approach comes with quite some downsides. Not only would you still loose parts of your not yet backed up content in case of a disaster, you’d also have to deal with your constantly growing data pool. While you might start with mirroring a single drive, in a couple months or years you might need to back up several disks to have a complete copy stored offsite. Not only is this pretty time consuming, it also can get very confusing and complex to keep everything synced and backed up.
All of the above sounds very frustrating and like no fun at all, right?
Well, I’m happy to tell you, that there’s a much easier and more efficient approach to get this task done: Cloud Storage.
Over the years, we’ve seen a constant increase in data speed of internet connections, while prices for online storage are getting cheaper and cheaper to a point, where now most of us can afford such offers. Paired with a NAS solution, like one of Synology’s DiskStations, you’ll get a professional tool to maintain your complete backup process. These days, there are many cloud providers to choose from but for sake of convenience, I focus on Synology’s own offer, the Synology C2.
Synology C2
Using a Synology DiskStation DS1517+ to organise my backups for quite a while now, it only made sense to me to try out their C2 cloud offering as well.
The Synology C2 is a very well integrated and cost-effective solution, which meets the high privacy standards required by EU regulations. The servers are located in Frankfurt, Germany, which should give you more than enough confidence that your data is as safe as it gets. They offer download to any destination, restoration on file-level and multiple historical file versions without any additional cost. Next to this, Synology offers flexible plan selections in terms of features, storage size, and cost, based on your personal needs.
Data Plans
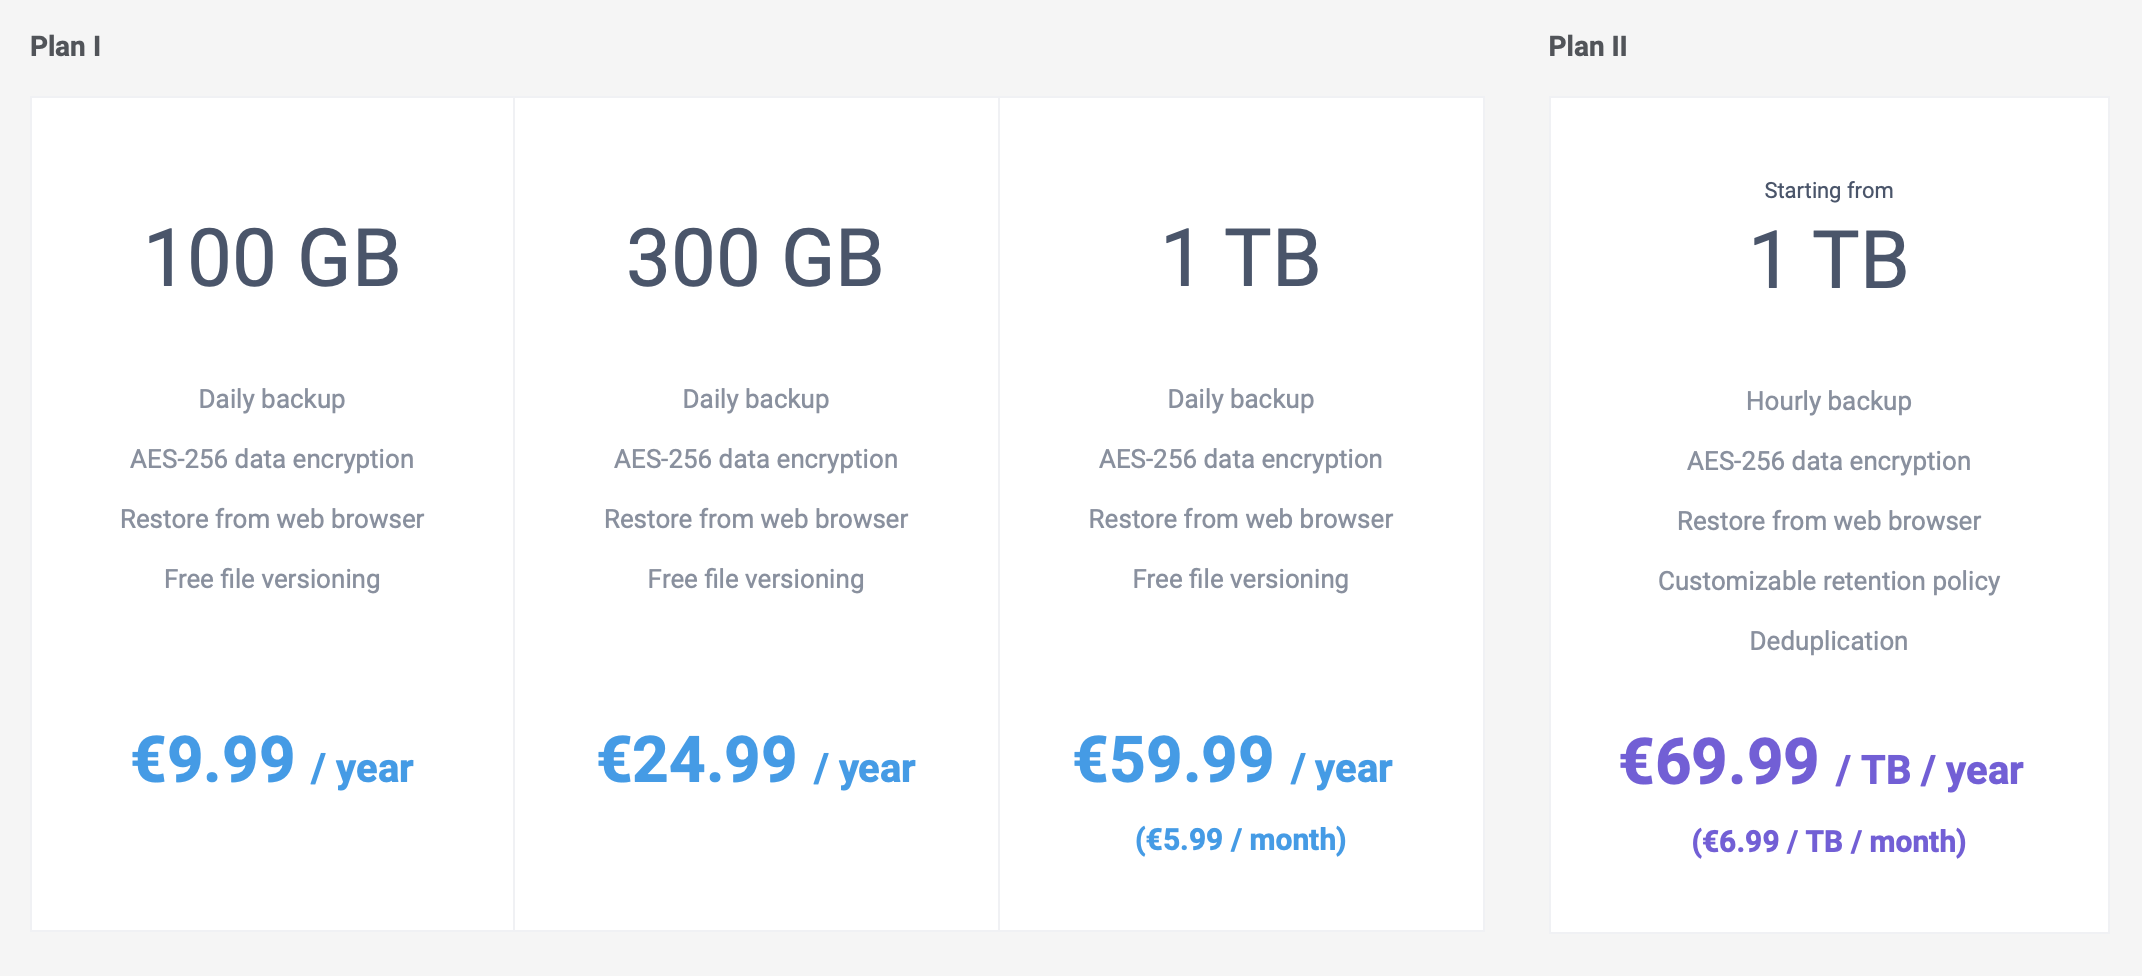
Synology C2 Pricing
You can choose between two plans, with Plan 1 offering storage sizes from 100GB up to 1TB including daily backups and Plan 2 starting from 1TB up to your size needed, additionally offering hourly backups, customisable retention policy and deduplication. Besides the monthly fees there are no other hidden costs and I personally think their offering is very competitive and well priced.
How to set up Synology C2 on your DiskStation
Like already mentioned, setting up Synology C2 is a very easy process and only takes you a couple of minutes.
First of all, you need to have a Synology DiskStation with the DMS operating system running on it and of course being connected to the internet. Next to this, you’ll need a Synology account to sign in later. Synology provides you a 30 days trial version for C2 with each account, so you can easily check out the features without having to pay upfront. If you don’t like the service, just go ahead and cancel before the trial period ends, otherwise just keep it running and it transforms into a paid subscription automatically.
Setup on your DiskStation with Hyper Backup
On your Synology DiskStation, make sure to install Hyper Backup from the Package center.

DSM Package Center: Install Hyper Backup
After the installation, you can go ahead and open Hyper Backup to set up your Synology C2 backup task.

Choose Synology C2 cloud backup as destination
On the initial screen, make sure to select Synology C2 cloud backup as destination type and follow the instructions on the next couple of screens, to set up your trial account and storage plan.


Set up your Synology C2 account
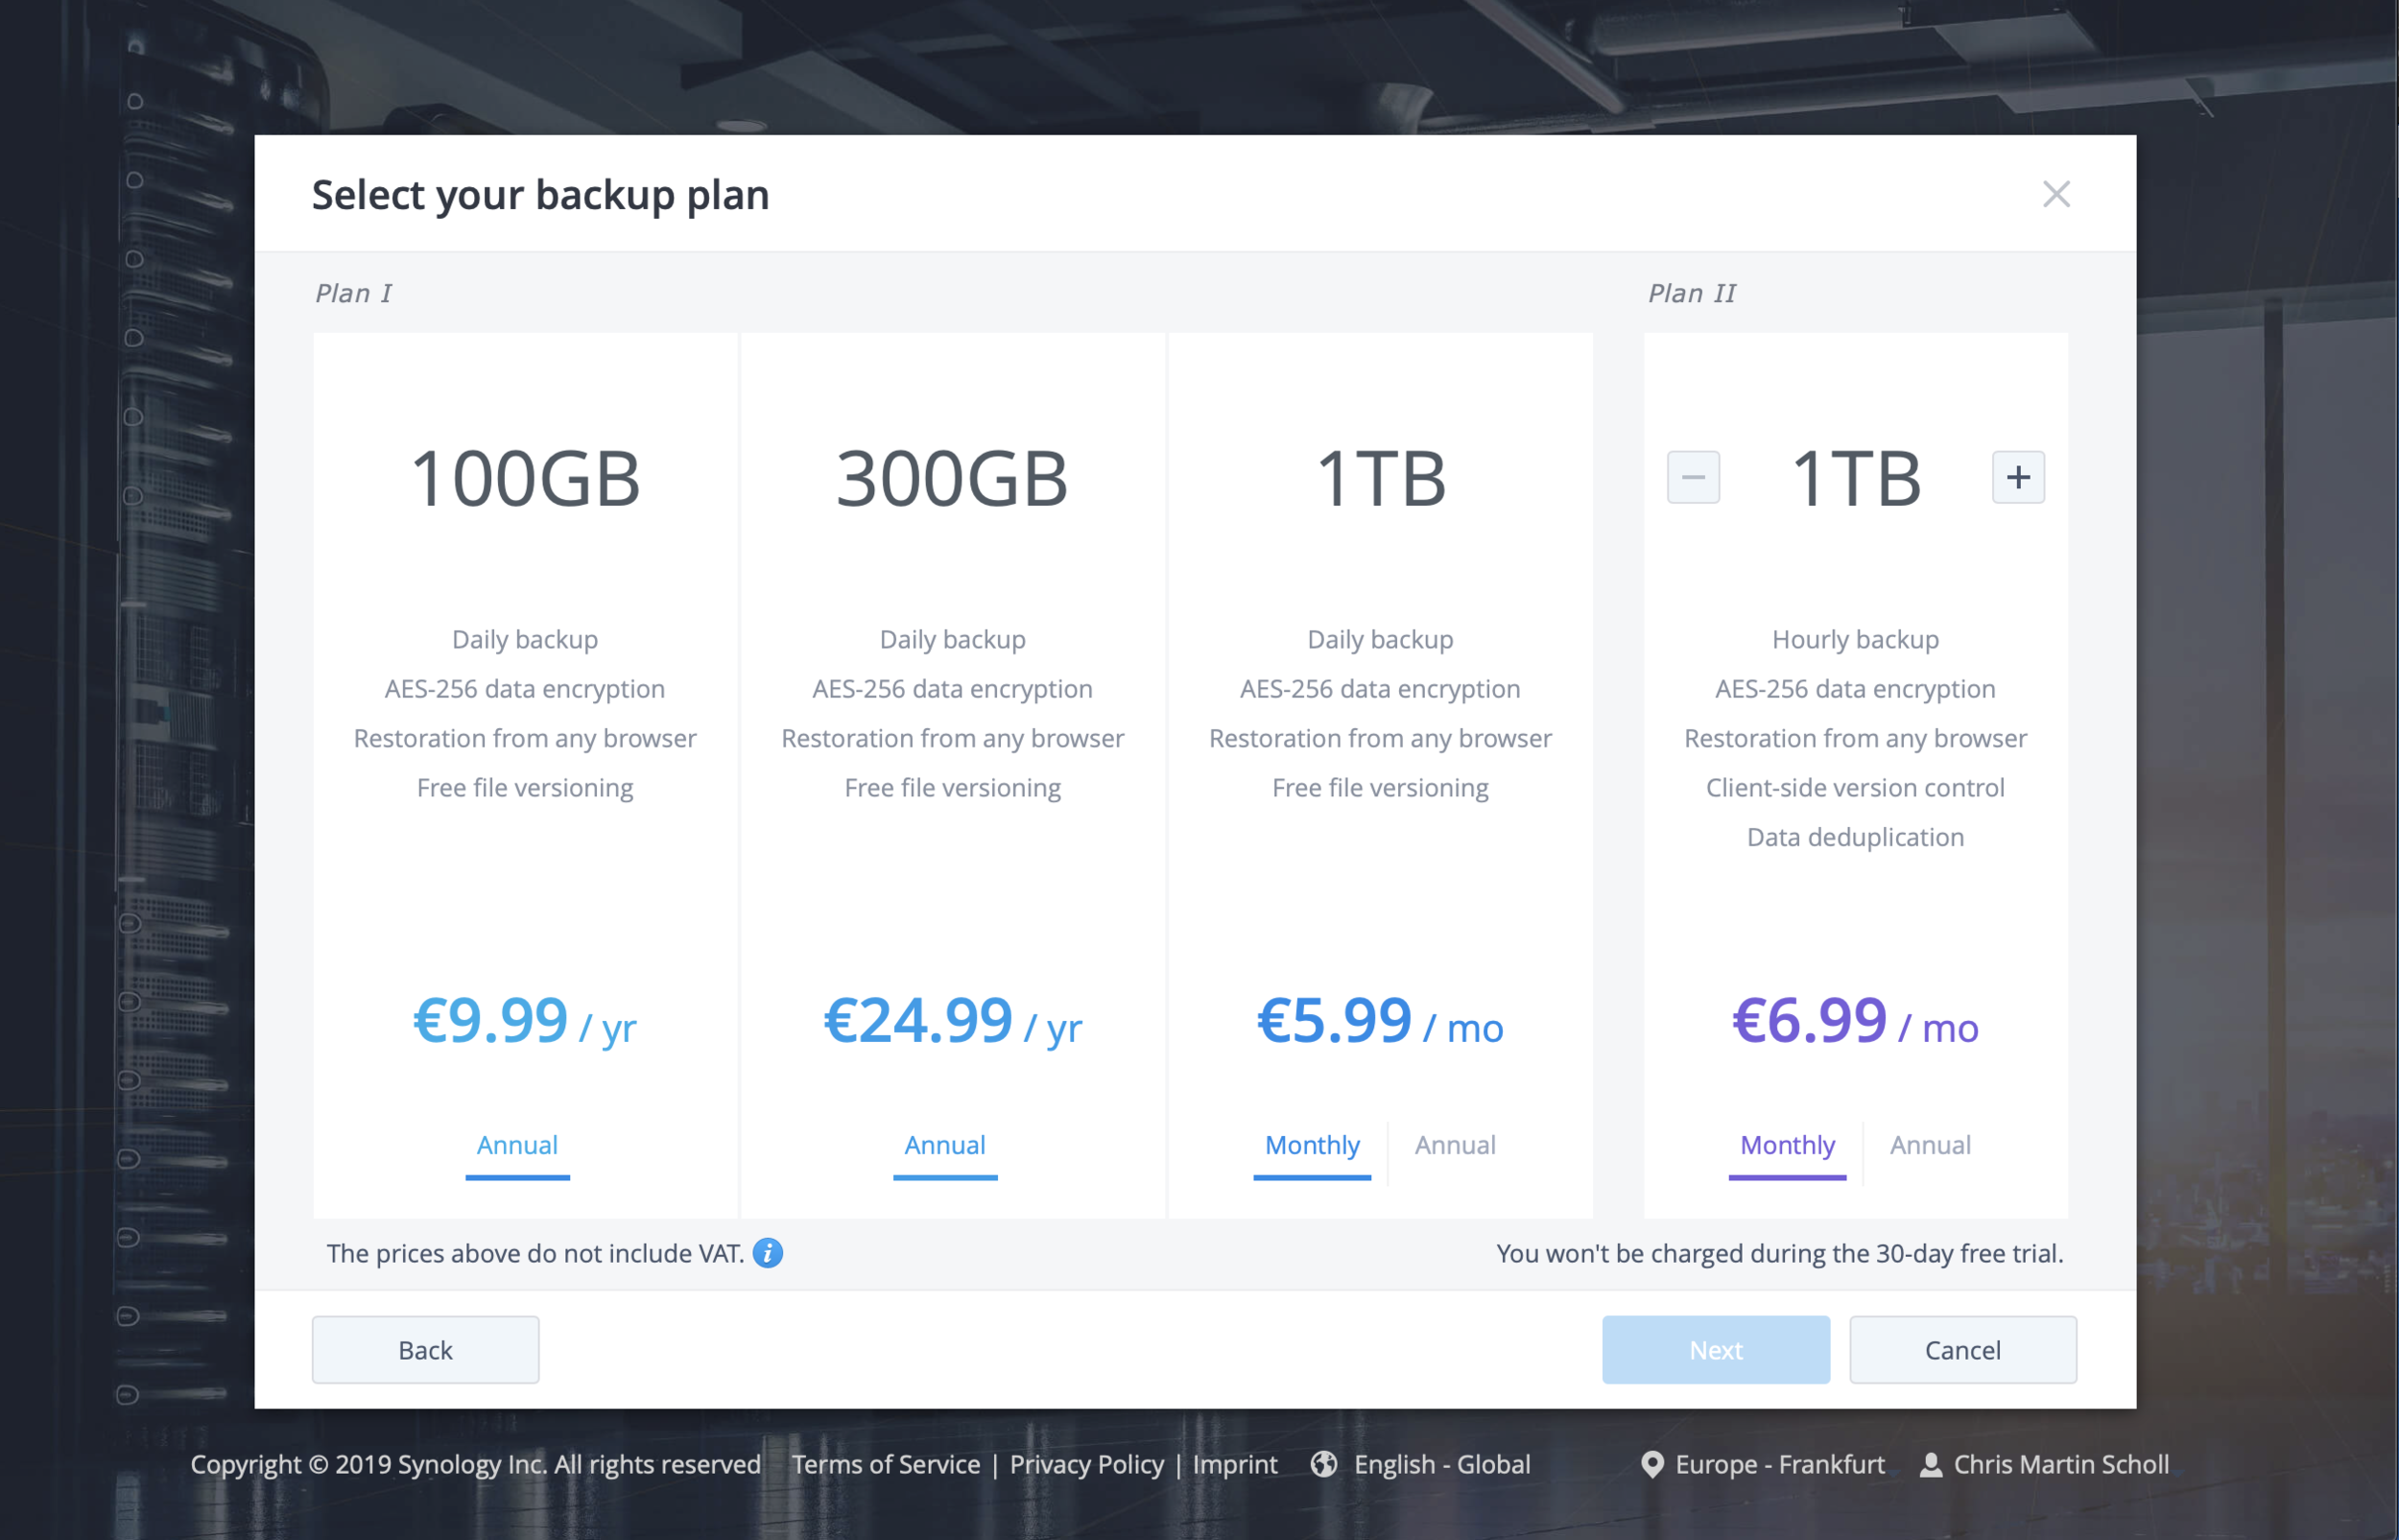
Make sure to hit the Get free trial now button and select your backup plan. Please note, that you won’t be charged during your 30 days of trial. After that the monthly rate is based on the plan you chose. So in case you plan to keep your account after the trial, kindly make sure to choose a plan which fits your needs the best.
Ones you finished the steps, you officially created your Synology C2 test account with only a couple of clicks, right from your DiskStation DSM interface. It couldn’t be any easier, right? Now, that Hyper Backup is linked with your Synology C2 account, it is time to set up your first backup task.

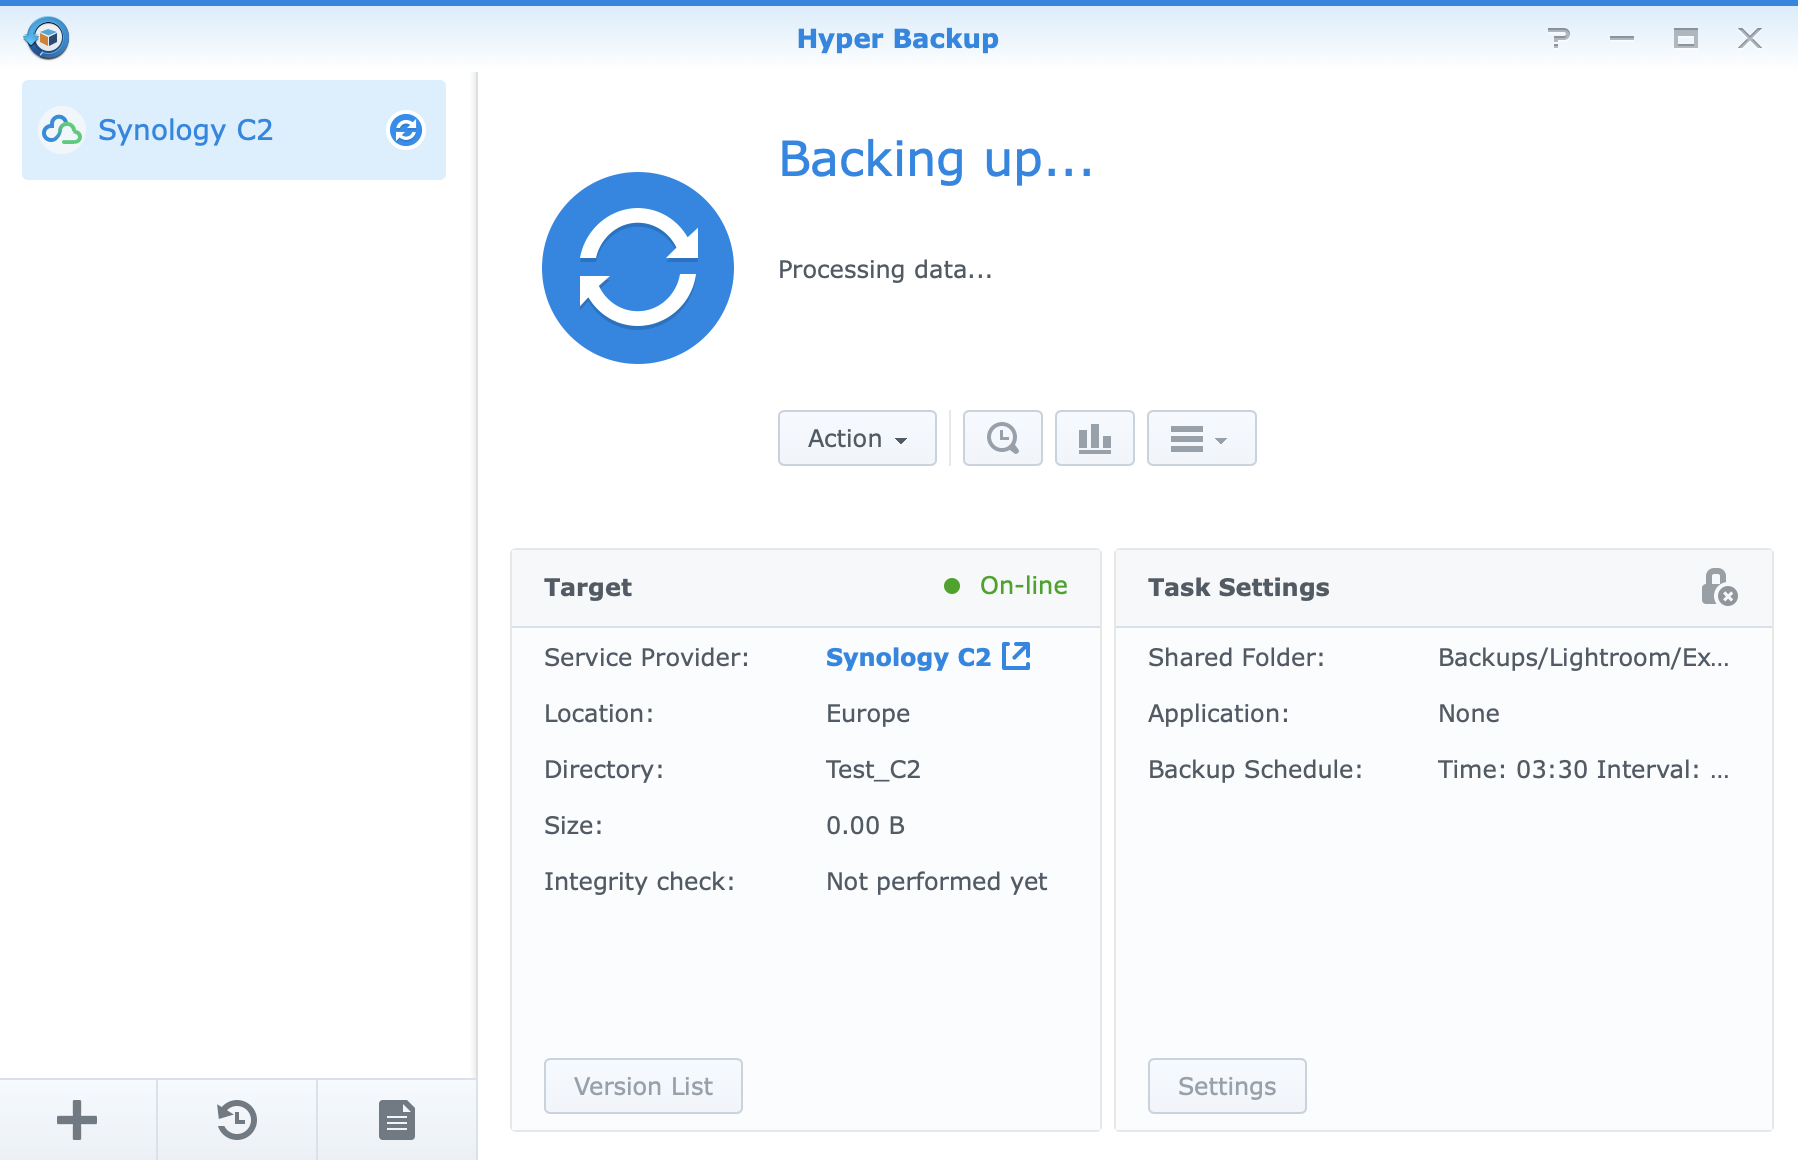
Create a backup task
For the sake of this blog post I set up a task called Test_C2, like you can see in the screenshot above. Hit the Next button, once you named your task, to continue with the setup.
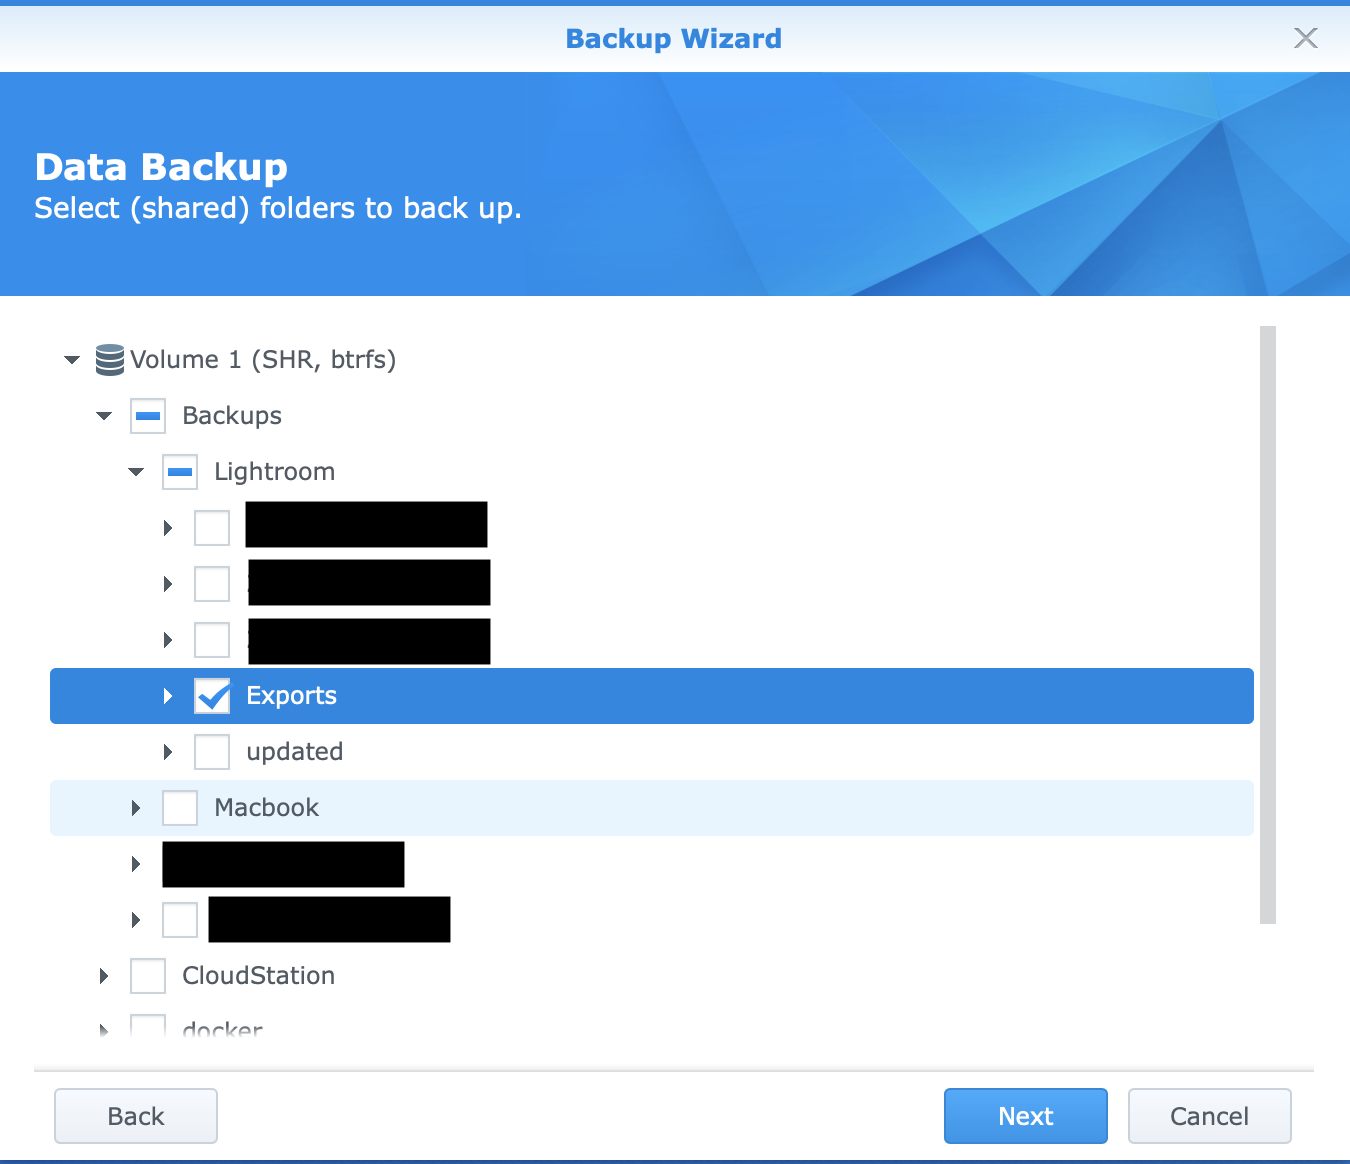
Choose the local data for backup
In this screen you have to choose the data you want to back up to your Synology C2 cloud account. You can easily navigate down your local folder structure on your DiskStation and choose the once you’d like to store offsite. This can be changed later at any point in time, so no worries if you need to change something in the future. Select your data of choice via the checkboxes and hit the Next button.
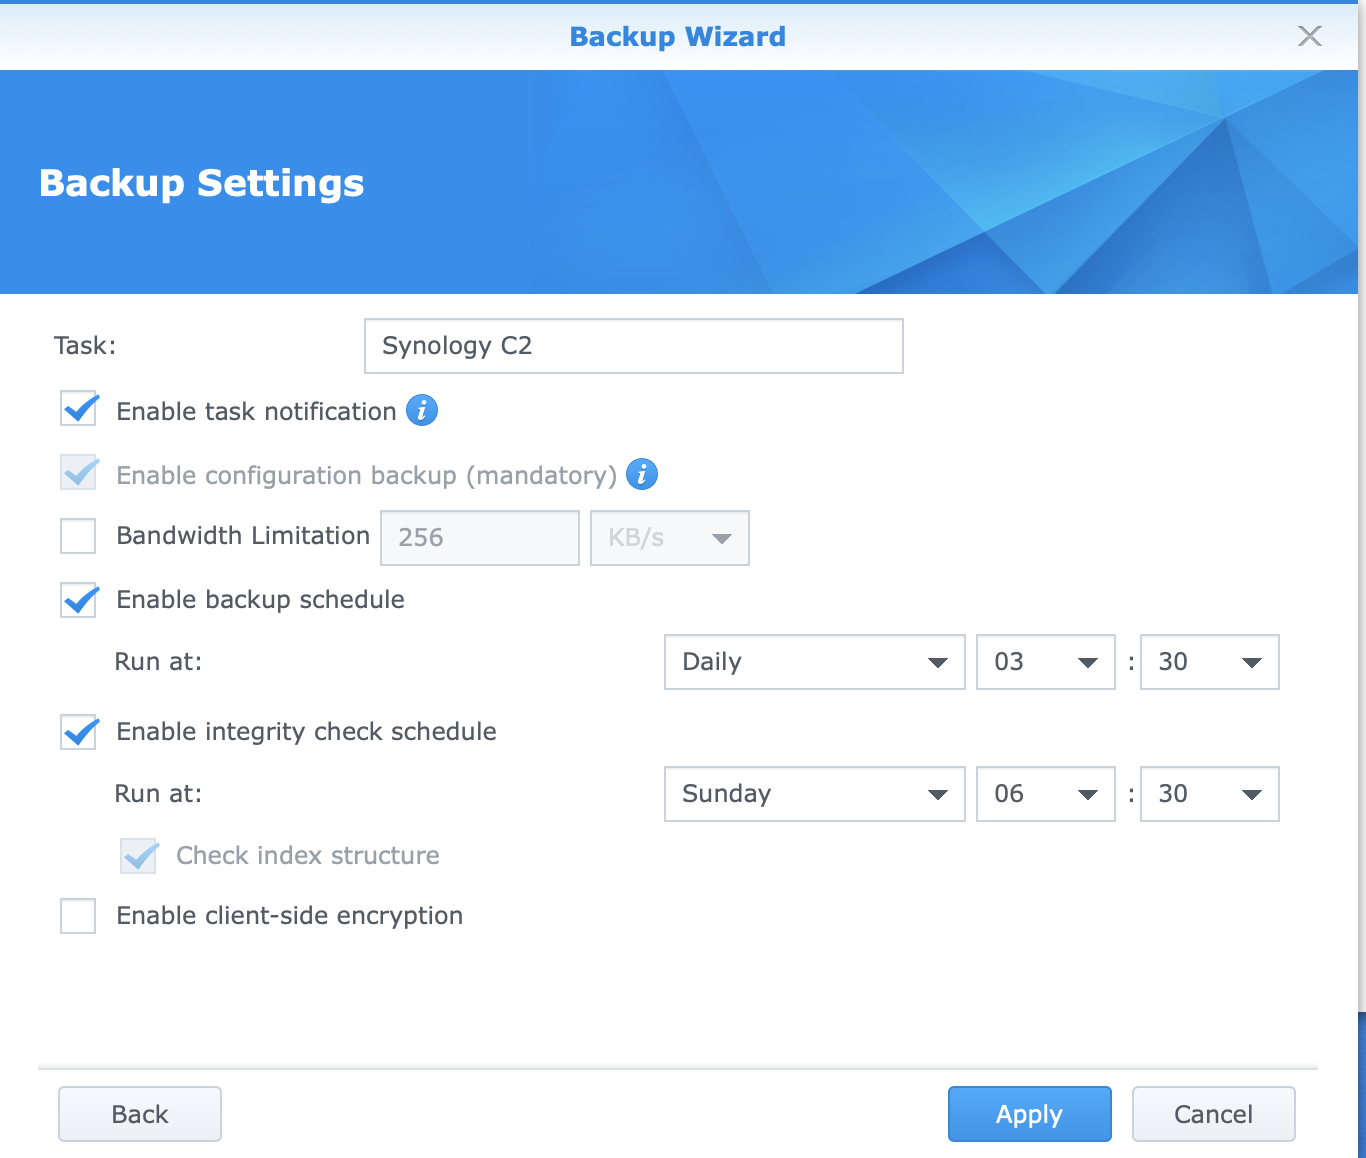
Further backup settings
In this screen you can set up a variety of things for your new backup task, like if you want to be notified after each run of the task has finished. Also, you can limit the bandwidth for the upload and set specific times for your task to run and to check the integrity of your backup. Both these schedules make a lot of sense in scenarios where you need the DiskStation for productive work during the day and you want to backup your stuff in the evening or times where nobody is working on the content. Not only does this guarantee a better performance while working but also that you always backup your up-to-date content. Additionally, you can also encrypt your backup for an extra step of protection. Once you chose your settings make sure to hit the Apply Button and your task is ready to go.

Start your initial backup
If you want to run your first backup right away, make sure to hit Yes on the popup and your newly created task begins to backup to the Synology C2 cloud right after it.
The Synology C2 web interface
Aside from using Hyper Backup right on your Synology DiskStation, you also have the ability to access your Synology C2 cloud account from any browser. The web interface is neatly arranged and offers a very clean finish.

Synology C2 web interface
After you logged into your account, you’ll be directed to the Dashboard view. It shows you a very nice overview about your created backup tasks and their last iteration, as well as the currently used and total storage available. In my case I went for the Plan 1 with 100GB storage available, as you can see above.
A nice extra feature is the diagram on the right, which exactly shows you the percentage each of your backup tasks takes away from the used storage. In my case it’s 100% for the Test_C2 task, as I didn’t create any other task so far. In real life usage, this would definitely give you a nice understanding of which tasks demand more storage than others.

Synology C2 backup overview
Clicking on one of your tasks in the Dashboard navigates you to a detailed backup overview, like shown above. Not only can you navigate down the folder structure, like you did when creating your task with Hyper Backup on the DiskStation, you can also download a complete folder or each single file. In fact, the whole structure works exactly like a locally available folder structure on your Synology machine and I found it a pleasure to use. Next to this, you’re able to change the versioning of each file by scrolling through the timeline at the bottom of the window. This will show you the different snapshots available and you can easily browse through a variety of versions until you find the desired copy of your content. This comes in very handy for situations where you i. e. accidentally backed up a corrupt file to the C2 cloud. Scrolling to a prior date enables you to restore a version, where it was still fully functional. Of course there’re many other scenarios, where a versioning of files is very welcome and useful.

Download a file or a whole folder structure
Last but not least, you’re also able to manage your C2 subscription through the web interface as well, like you can see in the screenshot below.
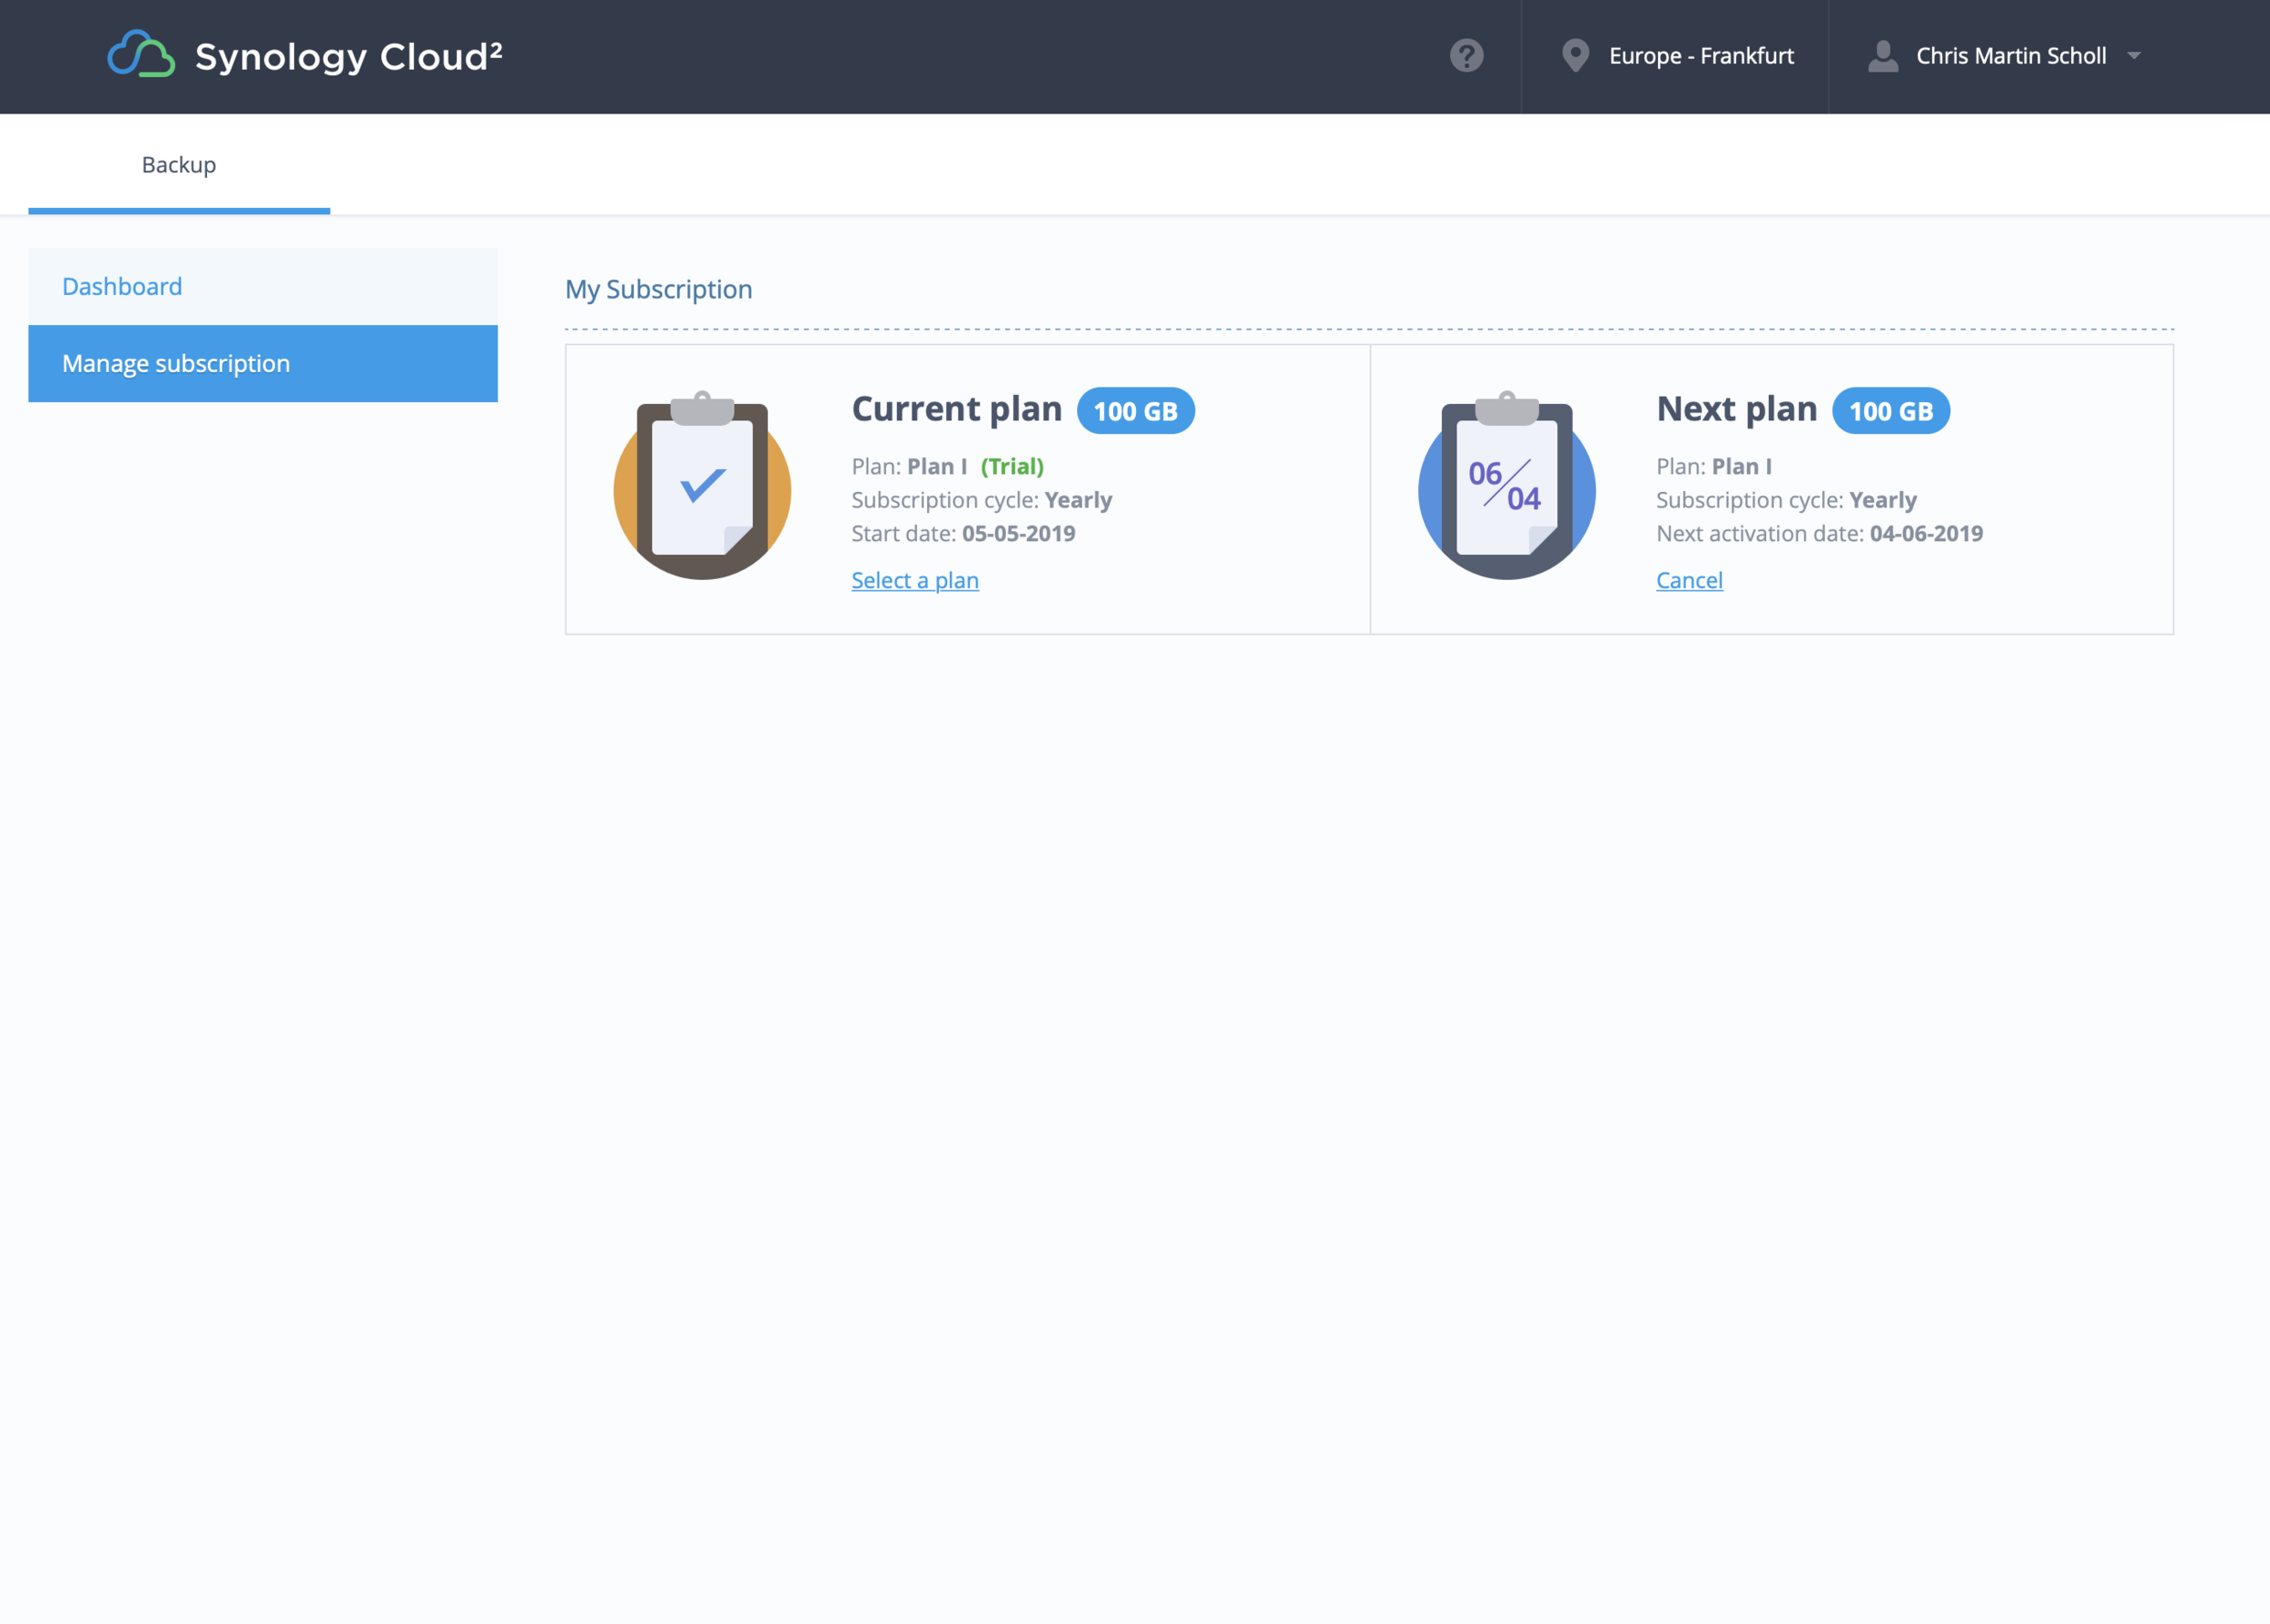
Subscription management
Like you can see, I currently have my trial Plan 1 with 100GB storage activated. You can also see a start period and the subscription cycle for each plan. Next to the trial you can see which plan gets activated, once the trial ends. You can cancel your plans at any time as well and it’s as easy as clicking the Cancel button.
Conclusion
The Synology C2 cloud is a very nice and well priced offer for not only businesses of all sizes but also for freelancing creatives and private users as well. The fact, that all servers are located in Germany and managed by Synology itself creates a nice foundation of trust. Especially when you plan to backup very valuable content it’s definitely worth considering this option to add a rock-solid layer of protection to your workflow.
For owners of a Synology DiskStation device, the Synology C2 cloud is as easy as it gets in terms of integrating a cloud service into your backup process. Like shown above, backup tasks can be set up in less than a couple of minutes and the whole technology will be seamlessly integrated into your environment. In case you need support or help, it’ll be the same contact person as for your NAS device: Synology. This not only makes it very easy and efficient to work with, but Synology is well known for their privacy standards and fail-safe solutions as well.
All of the above gets well-rounded by the nicely designed web interface, which you can access from any browser with an internet connection, without having your DiskStation available. It’s even possible to download the content to any device of your choice not being dependent on a Synology machine at all, in case a disaster destroys your hardware setup.
My personal experience during the test phase was very pleasing and I didn’t have any problems with the transfer times. Of course this also depends on your internet provider and router setup as well, but it’s nice to see that a provider finally seems to hold on his promises. As for my part, I’m very excited to use this solution within my daily business as a freelancing content creator and the Synology C2 cloud definitely let’s me have peace of mind when it comes to my most valuable good: My digital content.
Stay tuned and thanks a lot for following along.
Later,
Chris
Previous Synology Posts:
The Synology DS1517+: Revolutionize your digital workflow
The Synology DS1517+: Integration into my photography workflow (Pt.1)
The Synology DS1517+: Integration into my photography workflow (Pt.2)
Additional Information: